The Snapper Mower Blades Won’t Engage or Turn On for These 8 reasons
When you are having trouble getting the blades to spin on your riding mower or zero-turn deck, it is important to rule out mechanical issues, such as a broken clutch or deck parts, and investigate electrical issues. Many factors might be at play here.
A broken PTO switch, a stretched or worn mower deck belt, a belt that has fallen off the pulleys, a dead battery, a defective safety switch, or a blown fuse may all prevent the Snapper lawn mower’s blades from engaging or turning on. A worn or stretched mower deck belt, a belt that has come off the pulleys, a battery that is too old, or any combination of these might also be to blame. One or more fuses may have blown, the belt may have fallen loose from the pulleys, or the pulleys may have moved out of place. The belt might have come loose from its pulleys as another scenario..
Never attempt to reach beneath the mower deck before completing all of the safety procedures outlined in your Snapper mower’s handbook. In order to do this, you must first turn off the engine by taking the key out of the ignition and unplugging the spark plug wires.

Table of Contents
It Is Not Possible to Start or Engage the Snapper Mower Blades
1. A Snapper Mower with an Old and Worn Deck Belt
It is possible to revolve the mower blades by using the deck belt, which is used to grasp the pulleys on the deck. The belt will eventually get worn and will start to slide on the pulleys as time passes.
In the event that it is not changed, it may get so worn that it is unable to move the pulleys, resulting in the blades being unable to rotate.
Inspect the deck blade belt. A belt is considered to be worn if it has cracks, fraying, an appearance that is glossy and glazed, or if it rests deep in the pulley groove as a result of wear.
It’s time to get a new belt. Even if the belt isn’t the primary cause of your blades not engaging, you still need to replace it whenever it starts showing symptoms of wear.
The speed of the blades is controlled by the belt that grips the pulleys. To generate suction beneath the deck, which is necessary in order to lift the grass and provide an equal cut, a rapid blade speed is needed.
2. A belt on a Snapper Mower Deck became detached from the pulleys.
If the belt has been detached from the pulleys, it will no longer be able to rotate the pulleys and so move the mower blades. In addition to a worn belt, check to see if the belt is stretched, if the pulley is broken, if the tensioner arm is worn, or if the spring is missing.
Here you can discover a list of the things that, if present, will result in the Snapper belt continually coming off the mower deck.
A Snapper Lawnmower with a Worn Idler Tensioner Arm and Spring
The idler pulleys are held in place by a tensioner arm and spring combination that may be found here.
Either the hole in the bracket that is used to connect the spring might get worn over time, or the spring itself can become worn with time. Because of this, the belt can get untied and start to vibrate off of the pulleys.
The Snapper Pulley Contains a Worn Bearing
Each pulley will have its own bearing inside of it. It’s possible for the bearing to wear out, in which case the pulley won’t sit parallel to the mower deck. Because of the worn bearing, movement will be allowed in the pulley, causing it to wobble.
It’s possible that one side of the pulley is positioned higher off the deck than the other side is. The deck belt may get dislodged from the pulley as a result of the additional movement that occurs in the pulley.
When it is determined that a pulley’s bearing is damaged, replace the pulley.
3. A Snapper Lawn Mower with a Defective PTO Switch
The power takeoff switch, often known as the PTO switch, is normally a knob located on the side of a lawnmower. This switch activates the clutch by allowing battery power to flow to it. If the switch breaks, the fan won’t work since the power to the blades won’t be able to be supplied when the fan is turned on.
You should check the switch for continuity. Swap it out with one that has a plot hole.
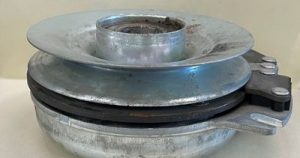
4. A Snapper Mower with a Defective Clutch
The Power Take Off (PTO) clutch is responsible for transferring power from the engine to the blades. This is accomplished by engaging the drive belt. When the clutch fails to provide power to the blades, it must be changed because it is either worn out or broken.
Check read the article “A Look into How Lawn Mower Clutches Work” for additional information on the clutches.
5. A Snapper with a manual clutch and a clutch cable that has seen better days; it has seen better days.
It is feasible to manually engage the clutch on Snapper lawnmowers if the mower comes equipped with both a cable and a clutch lever. One may start the engine by tugging on a cable that is connected to the clutch.
It is vital to do a comprehensive check of the clutch lever, cable, spring, bushings, and linkages to confirm that they are in great functioning condition and that the clutch can be engaged. This will ensure that the clutch can be engaged.
It is imperative that any component that has gotten worn is replaced as soon as possible.
6. A Snapper Mower with an Inadequate Battery
The power required to operate an electric clutch comes from the vehicle’s battery. When the battery is low, it is unable to provide the clutch solenoid with enough power to engage the mower blades. This occurs when the battery is discharged.
Utilizing a multimeter, carry out an examination of the battery’s voltage. A completely charged battery with a voltage of 12 volts should provide a reading of around 12.7 volts.
When the readout on the battery drops below this threshold, you should charge the battery. In the article titled “Five Things That Are Draining the Life of Your Lawn Mower Battery,” you will discover a list of frequent factors that contribute to the premature demise of your battery.
Putting a Snapper Battery on Charge: To charge a battery, you need make use of a battery charger. Put on some protection clothing so that you won’t be burned by the electrical current and shield your eyes. Do this before you proceed. In order to charge the battery of your riding mower or zero-turn mower using a charger, follow these steps:
- Gain access to the battery as well as the terminals. To expose the battery, you may want the assistance of a screwdriver. You may locate the batteries either behind the seat or under the hood of the vehicle. Take care not to take the battery out of its housing.
- Establish the connection between the battery charger cables, starting with the positive cable. This is the cable that is either red in color or marked with a plus symbol. Connect the cable to the connector on the positive side of the battery.
- Put the negative end of the cable into the negative terminal on the battery. This is the cable that is either black in color or marked with a negative sign.
- In order to avoid becoming electrocuted, you should avoid touching anything that does not have a rubber covering.
- Adjust the voltage and amperage levels on the charger so that they are at the required levels. Batteries for lawn mowers typically have a voltage level of 12 volts, however this might vary. A higher amperage results in a quicker battery charge. Beginning with two amps, gradually increase it to no more than ten amps. The best kind of charge is a gradual one.
If you discover that the battery is unable to maintain its charge, you will need to purchase a new one. Batteries for lawn mowers that run on 12 volts may be found at most home improvement and auto parts stores. Batteries could also be available from the dealership that sells lawn mowers in your area.
Bring along the old battery you were using. The majority of establishments will charge you a core fee if you do not supply them with your old battery. Core fees average $20.
7. A Snapper Mower with a Defective Safety Switch
As part of its operator presence system, a Snapper has a safety switch installed in the seat of the vehicle. The seat switch is attached to the underside of the seat and can detect whether the operator of the mower is sitting in the seat.
The blades of the lawn mower won’t start spinning until the operator is seated in the seat first. This is a safety feature.
If the seat switch is not functioning correctly, the operator may not be sensed in the correct manner. In the event that there is a problem with the seat switch, the safety mechanism will prevent the blades from engaging.
You may use a multimeter to test the seat switch, or you can temporarily bypass the safety switch in order to determine whether or not the switch is faulty. Because using a mower without the safety switch in place puts your safety at risk, you should never use one.
Always ensure that your equipment has functioning safety switches that have been fitted.
8. The fuse on a Snapper mower has blown.
It’s possible that a fuse has blown if the power isn’t coming from the battery to the clutch when you try to use it. The electrical system of the Snapper is shielded from potential danger by the fuse.
Always use a fuse of the same capacity to replace a blown fuse. If you keep having problems with the fuses blowing, I suggest sending your mower to a Snapper service dealership or a lawn mower repair shop so that they can determine the source of the electrical problem and fix it.
Is Your Snapper Lawn Mower Continuing to Give You Trouble?
If you own a lawn mower for a sufficient amount of time, you will eventually have issues with it, such as it failing to start, not continuing to run, smoking, leaking gas, producing an uneven cut, vibrating, or another problem.
In an effort to save you both time and money, I have compiled a guide that will assist you in diagnosing and resolving any issues that may arise with the Snapper mower you own.
You may see this instructional guide on the page titled Common Snapper Lawn Mower Problems & Solutions.
If you are not confident in your ability to properly execute diagnostics and repairs on your lawn mower, it is in your best interest to have a professional carry out the work.
By doing this, you will reduce the risk of injuring yourself or causing more damage to the mower. Your neighborhood Snapper dealership or lawn mower repair shop will be able to assist you in finding a solution to the issue you’re having.