Reasons Why Your Lawnmower Won’t Start, and How to Fix Them
It seems you’re having trouble getting your lawn mower going. You haven’t been able to get the engine to even turn over. When this occurs, you should start by inspecting the battery before moving on to the starter and electrical components.
A dead battery, damaged battery, unsecured connections and cabling, corroded electrical components, broken ignition switch or safety switch, defective starter solenoid or starter, or blown fuse are all reasons why a lawn mower won’t start.
Avoid getting shocked by being careful around electricity. Before doing any repairs on a lawnmower, make sure you read and follow all safety instructions. Instead of risking injury to yourself by trying to diagnose and fix the mower’s problems, have a professional mechanic do it.

Before diagnosing, repairing, or operating, be sure you’ve read and understood all of the safety recommendations in the equipment’s operator’s handbook. If you are unsure of how to proceed, if you lack the necessary knowledge, or if your health prevents you from completing the repair safely, you should seek the advice of a professional.
Table of Contents
That’s Why Your Lawnmower Won’t Start
A lawn mower with a dead battery
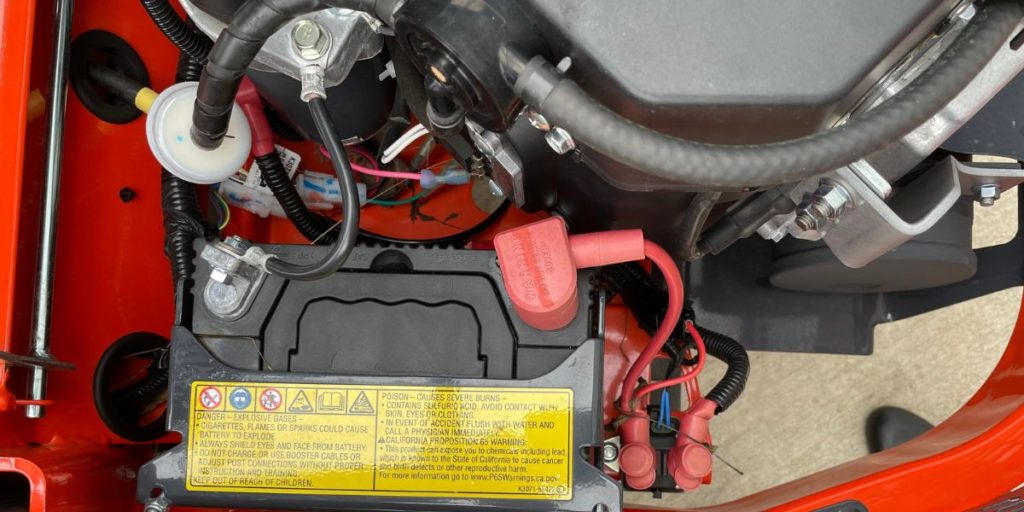
In the event that your lawn mower’s battery is dead or critically low on charge, you will be unable to start it. As a first step, use a voltmeter to determine the battery’s current state of charge.
The voltage of a fully charged 12-volt battery should be around 12.7 volts. Any reading below this indicates that the battery needs to be charged.
Check out “5 Things That Are Draining the Life of Your Lawn Mower Battery” for a rundown on how to put the battery to the test. You’ll also learn about other factors, including leaving the key on or a malfunctioning charging mechanism, that might shorten the lifespan of your battery here.
The longevity of your battery, especially while stored, is greatly increased if you keep it charged. Not completely charging a battery before bringing it into cold temperatures might cause it to freeze and malfunction.
Recharge a Dead Battery: If your battery needs recharging, use a battery charger. Please safeguard your eyes and skin from any electrical shock by donning protective clothing before proceeding. Using a charger, charge the battery for your lawn mower as follows:
- Obtain entry to the connections and batteries. A screwdriver may be required to access the battery. Keep the battery within its case at all times.
- You should plug in the positive cable first when connecting the charging wires. We’re talking about the plus-sign cable, which is either red. Hook up the wire to the battery’s positive terminal.
- Join the negative end of the cable to the battery’s negative post. The negative-sign cable, often known as the black cable.
- Do not risk electrocution by touching anything that has not been rubber-coated.
- Adjust the charger’s voltage and current to suit your needs. Lawnmower batteries typically have a voltage level of 12 volts. The battery may be charged more quickly with an increase in amperage. It’s recommended to begin with 2 amps and gradually increase up to 10 amps. It’s best to charge slowly.
A new battery should be installed if the old one is unable to maintain its charge. You may get a replacement battery at any home improvement store, hardware shop, or auto parts outlet.
Please remember to bring your used battery. Unless you bring in your old battery, most stores will charge you a core fee.
Problems with a lawn mower’s wiring and connections
Loss of connection between the battery and the wiring and other components of the mower is a regular problem. When operating, a lawnmower is subject to vibration and shaking, which can dislodge electrical components and disrupt continuity.
A lack of excellent continuity can be caused by a number of factors, including slack wiring and the corrosion of connections and terminals brought on by moisture.
A baking soda solution can be used to get rid of the rust (2 cups water to 3 heaping tablespoons of baking soda). Tighten up all of the cables and plugs.
Wires, connectors, and terminals should be swapped out if you notice any signs of deterioration or severe corrosion.
Bad Fuse on a Lawn Mower
A fuse is installed to protect your lawn mower’s electrical system. Check your mower to make sure you don’t have a blown fuse.
If you’re unsure if the fuse is blown, you can check it by placing a multimeter probe on each prong of the fuse to measure resistance. A resistance reading near 0 means your fuse is good. An infinity resistance reading indicates a bad fuse.
Replace a blown fuse with a fuse with the same amperage as the fuse you are replacing. If you continue to blow fuses, you should bring your mower to your local lawn mower repair shop or dealership to find the root cause of the problem.
A faulty ignition switch on a lawnmower
When you try to start your mower by inserting the key into the ignition switch or turning the toggle switch (on mowers with such a switch), nothing will happen.
Whether you suspect the ignition switch is broken, you can test it with a multimeter to see if there is any continuity. Locate the “B” for battery and “S” for starter solenoid prongs to complete this task.
Put the key in and turn it until you reach the “on” position. One probe is touched to the B prong, while the other is placed on the S prong of the plug in order to measure the resistance.
A high quality key switch for the ignition will have a resistance reading close to zero. Replace the switch if the resistance reading approaches infinity, which indicates that something is wrong with the key to the ignition.
A Lawnmower with a defective safety switch
A safety feature called “operator presence control” has been put on your lawn mower to safeguard you from being hurt.
The safety switches in this system will not allow the mower to start until specific conditions are satisfied, such as the brake being engaged on a ride-on mower or the bail lever being held against the handle of a push mower.
Incorrect use of the safety switch on a mower might render it inoperable. In order to see if the switch works, you need use a multimeter. As a troubleshooting measure, you may try briefly disable a safety switch to see whether the problem persists.
Never mow the lawn without first turning on the safety switch. Never use a lawnmower with the safety switch removed. You never know when you might need a safety switch, but having one is always a good idea.
Your Husqvarna Mower’s Starter Solenoid Is Broken
For the lawnmower’s engine to start, an electromagnetic switch called a “starting solenoid” must be activated.
When the starting solenoid’s spring loses its strength or the copper plate corrodes, the device might malfunction. The solenoid might fail for a variety of reasons, including a weak starter, a defective battery, or a poor ground.
A fully charged battery is required prior to testing the starting solenoid. Keep putting it through its paces by following the procedures outlined in “How to Tell Your Lawn Mower Solenoid is Bad” for determining if the solenoid is malfunctioning as the starter.
Your Husqvarna Lawnmower’s Starter Motor Is Bad
If your lawnmower won’t start, you should check the starter after eliminating the battery, cables, wiring, ground, and beginning solenoid. You may take out the starter and put it through its paces.
Instead of merely buying a new starting for your lawnmower, have your local repair company that specializes in starter and alternator repairs test it and replace it if feasible.
Is Your Lawnmower Still Giving You Trouble?
Inconveniences arise occasionally when using a lawnmower. If you keep a lawnmower around for long enough, you’ll run into issues with starting, smoking, leaking, cutting, and overheating.
More about: Lawn Mower


