Kawasaki Voltage Regulator Wiring Diagram & Answers to Common Wiring Confusion!

Not being able to complete the wiring, because you don’t have any visual reference to follow. That’s not just you, but a lot of people dealing with voltage regulator issues of the Kawasaki.
And that’s why we feel a Kawasaki voltage regulator wiring diagram is necessary. Along with some information on the wiring, specifically, confusions that need some sorting.
Basically, what we are targeting to talk about today!
Table of Contents
Kawasaki Voltage Regulator Wiring Diagram
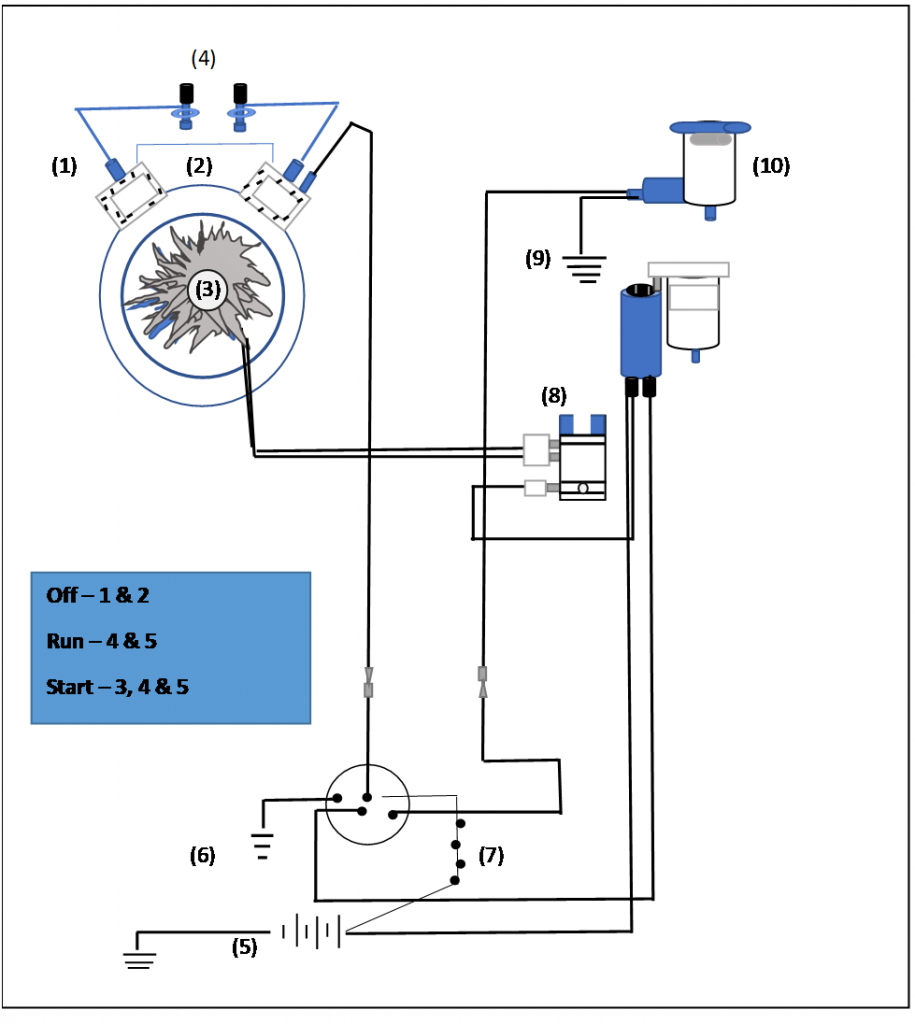
To test your voltage regulator, having the diagram will be helpful as you’ll need some information on the parts and the wiring that goes with it.

If you look into the diagram, there’s a Flywheel that refers to the (1). And then, the (2) and (3) figures indicate the Ignition Coils and Charging Coil. Near to the Ignition Coils, there’s the number (4) that indicates Spark Plugs.
Afterward, you’ll find the Battery, Key Switch, and Fuse in the same place mentioned as the number (5), (6), and (7). The (8) number is represented as the Voltage Regulator part.
Next on the diagram of the Kawasaki voltage regulator is number (9) that stands on Electric Starter. And, the (10) number is referred to as the Carburetor.
How To Test The Kawasaki Voltage Regulator
The ideal time to check the voltage regulator would be when you find out the battery is good enough but it keeps going dead. That’s when you know there’s something wrong with the voltage regulator. And you can confirm it in two ways.
Which one should you try for testing? That depends on the layout of your lawnmower.
Testing Through the Battery:
Testing Through the Voltage Regulator
Few Common Confusions That Need Answer
This is a very common scene for those who don’t have a clue about how the voltage regular space connections work. You may be cleaning the part and notice the motor running voltage is not enough.
For example, if it’s the Kawasaki 25hp motor, having a reading of 12.2v is not enough. On full throttle, the lots should be 13 to 14.7 volts.
Now back to the space connection, in this case, it should be three. Two would come from the stator. One wire from the starter should be hooked to the voltage regulator.
Also, some may get confused on whether to go for a straight wire or fused link. And in the case of fuse, what should be the size. Well, apparently you cannot have enough fuses.
And so going with a 20–25-amp fuse along with an inline fuse holder, sounds like the right installation to think about here.
You May Like This Video Too!
Frequently Asked Questions(FAQs)
How do I know if my voltage regulator is bad?
There are many symptoms that notify us of a bad voltage. And these are having low, high, or no voltage output, dim or flickering lights, erratically behaving engine, headlamp working weirdly, and so on.
Can a voltage regulator drain your battery?
Yes, there’s a risk of the voltage regulator draining the battery once it goes bad. And that’s also one of the main reasons why you should replace the voltage regulator as soon as possible. Or else the cost of a dead battery will also add up in no time.
What happens if the voltage regulator fails?
The external systems of the lawnmower will face trouble if the voltage regulator fails. As it won’t be able to cycle power from the battery properly.
Wrapping Up
So now you have the Kawasaki voltage regulator wiring diagram and ways to check if the part is working right or not. Even for replacing the part, you need to have a proper idea of the area where the voltage regularly connects to other components.
Keeping track of the voltage regulators wires is that’s why so necessary.


