5 Locations Where a RYOBI Generator Leaks Gas
Your generator gives off a strong gas odor, but you can’t seem to track down the source. Once the gas has evaporated and left no traces of a leak, it is far more difficult to locate the source of the leak.
A damaged carburetor bowl gasket or trapped float can cause gas to leak from the carburetor of a RYOBI generator. The fuel filter, fuel lines, fuel tank, or fuel shut-off valve could all be sources of leakage.
To prevent the generator from overheating, you should always work in an open environment with plenty of ventilation.
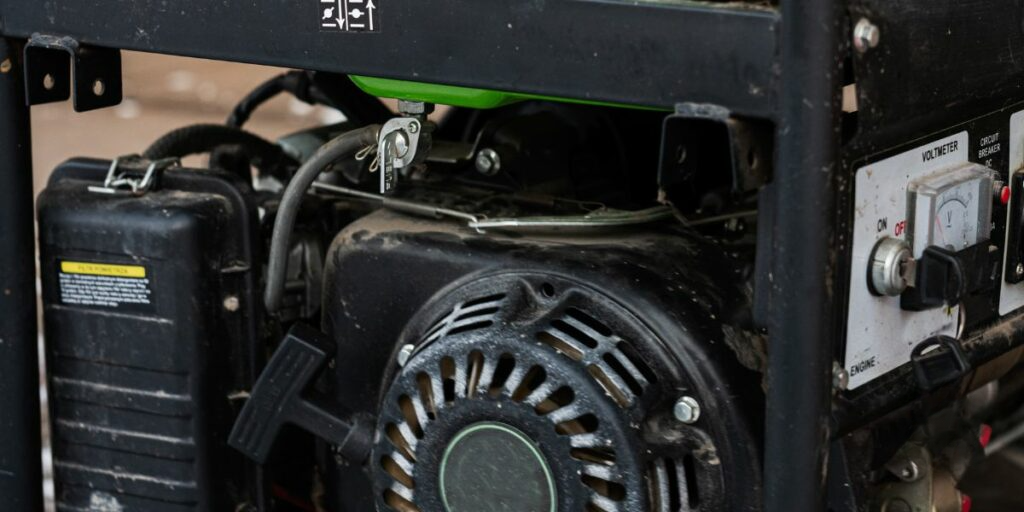
Table of Contents
RYOBI Generators Can Start Leaking Gas Here
A RYOBI Generator’s Carburetor
There may be a leak in the carburetor, so make sure you check it out. After leaving the gasoline tank, some fuel is temporarily stored here.
Varnish formed from gas sitting in the carburetor might cause its small pieces to stick, preventing the carburetor from regulating the amount of fuel entering the engine. Because of this, it may begin to overflow.
Carburetor leaks can be caused by a number of issues, including worn or broken internal parts, and a faulty bowl gasket.
Damage to the RYOBI generator’s carburetor bowl caused by a blown gasket
Examine the carburetor’s bowl attachment first. A thin gasket resembling a rubber band between the carburetor and the bowl.
The gasket serves as a seal between the components to prevent gas leakage. When this part of the seal fails, gas will leak out.
This gasket often gets hard and brittle after some time. The gasket is hot while the engine is on and cold when it’s off because of its proximity to the engine.
The gasket’s sealing ability deteriorated as a result of the repeated stress of heating and chilling. A replacement carburetor bowl gasket should be purchased and installed if a leak is discovered here.
Changing the gasket in the carburetor bowl entails the following steps:
- Use the fuel shut-off valve to stop the fuel flow. If your generator doesn’t have a fuel valve, you can crimp the line with a pair of pinch pliers to stop the gasoline from flowing.
- Before removing the bowl, make sure the carburetor’s exterior is clean so that debris doesn’t get sucked into the engine.
- If there is any gasoline left in the bowl, gather it using a towel or a small container.
- There may be a screw on the side of the gasoline bowl that can be used to empty the carburetor. If yours does, you can unscrew the screw, pour the fuel into a container, and then put the screw back in. Unless that’s the case, continue on to the following section.
- The bowl of the carburetor can be removed by first removing the screw that secures it.
- It’s time to get rid of the old gasket and install the new one.
- Replace the carburetor bowl.
- Replace the screw that was holding the bowl to the carburetor.
- Any remaining petrol leaked from the carburetor should be wiped away.
- Start the engine with the fuel pump running to make sure the carburetor isn’t leaking any more.
Float caught in the RYOBI generator’s carburetor
After that, check for fuel seepage close to the port where air is taken in. When a leak appears here, it may be due to a trapped float that is preventing the correct amount of gasoline from entering the bowl.
When the float in your carburetor gets stuck, fuel keeps pouring into the bowl and eventually spills out.
When you notice a stuck float, you need to disassemble your carburetor to find out why. If the float is getting stuck, cleaning the carburetor might help.
The carburetor might need to be rebuilt or replaced before it will function properly again.
Ryobi generator carburetor float needle is stuck
The float needle is the last part of the carburetor that has to be checked. The float needle cooperates with the float to maintain fuel flow to the bowl of the carburetor. There will be maintenance involved if the needle becomes jammed.
If your carburetor’s float needs repairing, you may either take it apart and do it yourself or take it to a small engine mechanic.
Your RYOBI Generator’s Fuel Filter Is Cracked or Soaked
Check out the gas tank’s fuel filter after that. It is possible for gas to seep from the housing if any cracks have formed or if the plastic has softened.
Exposure to gas can cause polymers to deteriorate. Over time, a fuel filter that hasn’t been changed regularly can soften, leak, and need to be replaced.
If your filter has a leak because of a break or if the plastic has become brittle, you will need to get a new one.
Remove the inline filter from the fuel lines carefully. Pieces of the flimsy plastic can rip off and get stuck in the gas lines.
Your RYOBI Generator’s Gas Tank Has Leaked
The fuel tank on your RYOBI generator could be made of metal or HDPE. Both types are equally susceptible to leaking as they get older.
Unfortunately, the polyethylene tank’s seams can break and cause a fuel leak. A metal fuel tank can rust and develop a hole if the fuel is left in there for an extended period of time.
If the fuel tank has a leak, it should be replaced.
However, you might not have this choice if your vehicle has a metal tank and is an older model that is no longer produced. Fixing the hole is an option.
The RYOBI Generator’s Defective Safety Valve
The gasoline shutoff valve frequently develops a leak. The RYOBI generator’s valve can leak whether it’s constructed of plastic or metal.
Fix the gasoline shutoff valve that has failed.
Fuel Lines for Your RYOBI Generator
As time passes, fuel lines dry out and crack. There will eventually be fuel leaks due to cracks that form over time. Broken fuel lines must be replaced immediately.
Check the hose’s connection to the fuel components to ensure there is no fuel seepage and that it is properly attached to the fuel line.